Sunday, 28 February 2016

Catwalk photo shoot - 1


The Hair

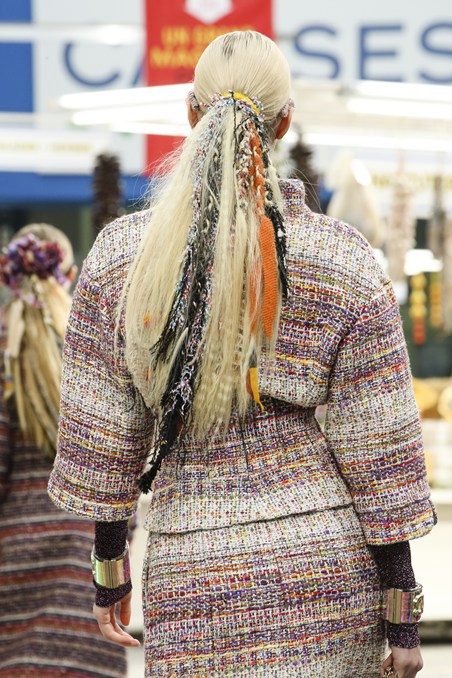
The hair for shoot one has been inspired by the Chanel ready to wear AW14/15 show which was featured in a the historic Grand Palais in Paris that was set up to look up like a supermarket. Chanel though a huge fashion house still is creative and really pushes the surrealism that they can create in their catwalk shows. I felt that this hair would be great for my catwalk inspired shoot because I liked the different textures that I would be able to create with the hair; a unique pony tail with a range of materials in that I would purchase from fabric shops. The materials in the hair colour wise was a colourful range but for me I want to look at using colours that really are classic to the brand so blues and golds. I also want to plait the hair just to add some more dimension to it much like the crimping from the show above. 


The Makeup 
The makeup for this shoot has been inspired by a range of previous shows which I think can be developed into a new makeup look. For this shoot I want to use a lot of blue because from my previous posts I have noticed a clear connection between the tone and Chanel itself. From the images I've used from the Ready to wear SS15 and the Ready to wear SS16 shows which both feature heavy eye makeup with perfect skin.  I'm gonna use a highlight on top of the blue just to add more of a metallic finish to the eye which I think will look really great on camera and make the dimension's of the blue shades really stand out. The blue shading's will be from my Urban Decay Vice Palette and my La Roc summer tones palette. 

The skin itself will be a even coverage that covers imperfections much like the perfect skin of the models for the catwalk. The cheeks I wanted to accentuate the cheekbones adding a bit of colouring like the Chanel couture AW13/14 show (the bottom photo). I believe that the more extreme cheeks will really work with my already youthful look adding another pop of colour to look I will be using the colouring of a Illamasqua cream blusher in Libido which is a orangey finish and think would look great on my model who I've already picked.


The outfit 
The main piece of clothing that I shall be definitely feature in my shoot is this dress from the clothing brand TBA. The pom pom detailing of this dress I feel would look awesome in my catwalk shoot as I feel like the dress look's expensive and has resemblance's of Chanel fashion with the breast pocket detailing and the zip down the middle which in my mind resembles a Chanel jacket. The pom pom detailing also adds a really modern and playful feel to the outfit which I feel will match the makeup choices. 

Matte. glossy. Satin lips

Health and Safety

  • Clean washed hands must always be the first thing before touching client
  • Hair is tied back at all times
  • Model should be wearing a apron or protected clothing
  • Must check whether there is any contraindications such as sickness or infection


The choice of lipstick can reflect our personalities; certain colours suit different skin tones more or can make someone look harsh. Choosing the right lipstick is a real task. In our lesson with Fenella working with a partner we had to create some lip looks that would also really suit our models complexions. 

A nude lip - My models lips were a natural dark pink so just to intensify the colour slightly more I used a little bit of Mac Whirl and blended it into the lip to create a more natural block natural lip colouring. 

A Red Lip- Using red lip mix and a blue Illamasqua lip gloss I created this colour; I added blue because I felt like it would really suit my models skin tone which I think it has. The colour is a subtle red and not too heavy and intense red.

A glossy Red Lip- Adding shiny mixing medium created the glossy red lip; good for adding some extra glamour for the look. The mixing medium worked great but any clear lipgloss would still achieve desired look.

A dark Lip- using two dark shades from my Kryolan lip rouge mini palette I created this dark current look.

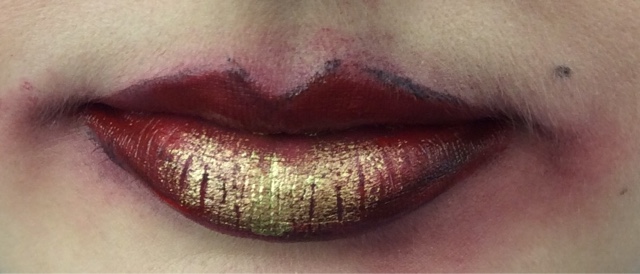
Catwalk inspired lips- The last lips that I created where inspired by smudged lips that had graced the catwalks the lipstick was smudged using my finger for the desired look. A fun look to create with the luxury look from the gold illamasqua liquid gold 


Thursday, 25 February 2016

Beach Hair


Health and Safety


  • Clean washed hands must always be the first thing before touching client
  • Hair is tied back at all times
  • Model should be wearing a apron or protected clothing
  • Must check whether there is any contraindications such as sickness or infection
Equipement
  • Brush
  • salt spray
  • hair dryer with diffuser head on
  • Curling wand
  • straighteners  
Look one is a salted spray textured look; Spray the hair all over with the spray. Next take strands of the hair and twist it into a coil in the hair like in the photo. Once the hair is rolled take some straighteners and press down on the hair ensuring all the hair is covered; leave hair to cool. Once all the head is done tousle the curls out with your fingers. 
This look is extremely simple; Spray the head all over with the salt spray and then dry the head with a hair dryer with a diffuser head in place, the result will be the hair in the photo next to this, the look is very textured and great for films and television for a beach day look. 


Curly hair


Salt spray the hair again and then using a curling wand placed upside down in its placement twist the hair around the wand and leave for 5/8 seconds. Leave out the ends of the hair so the look isn't to curly. At the end to relax the hair even more tousle the curls with your hands. 

Eye shapes and Eyeliner


Health and Safety

  • Clean washed hands must always be the first thing before touching client
  • Hair is tied back at all times
  • Model should be wearing a apron or protected clothing
  • Must check whether there is any contraindications such as sickness or infection
Equipment needed
  • A thin eyeliner brush
  • Black Eyeliner (I used mac black black)


In this class we were looking at different types of eyeliner looks that we were allowed to explore into. The original base we all had to start from was a thin just about the eyelash eyeliner mark which was meant to look simple, even and more natural. For me eyeliner has been a development especially securing a neat finish to the final look which I think has been achieved with my hand. The second was an adapted look from the thin line to more of an evening look with winged eyeliner sides. Using a brush to apply the eyeliner I feel creates a much nicer finish and allows for the eyeliner to be applied with more application which I've been perfecting more in my second year. The third and final adaptation was one that we would be inspired by from a range of imagery at the front of the class. The image that I went for was one in which I'd never thought of doing involving blending the eyeliner out onto the socket of the eye and adding metallic pigment to finish of the creation. I really like the final image because it really shows the curve in which I followed for the shaping on the eyelid. I also felt that the colours really suited a late winter feel with the coppering flaring out against the black of the liner structured brows and rest of my models look. 


Monday, 22 February 2016

Matte & Dewy skin

In this lesson we focused on creating Matte and Dewy skin, vital techniques that we need to perfect for shoots and in our work. The perfect base for any look.

Health and Safety

  • Clean washed hands must always be the first thing before touching client
  • Hair is tied back at all times
  • Model should be wearing a apron or protected clothing
  • Must check whether there is any contraindications such as sickness or infection
Products Needed
  • Strobe Cream- Mac
  • Face and body foundation- Mac
  • Mist & fix - Makeup forever 
  • Set powder - Mac
  • Makeup Fixing mist - Pixi
  • Pro long wear Concealer-Mac 


  • Prep the skin by removing any past traces of makeup; use cleanser, toner and finish moisturising the face. Make sure there are no contradiction's for the model such as allergies or irritation
  • Apply foundation onto moisturised skin that has been lightly sprayed with the Pixi fixing spray as its a great light primer and prolongs makeup wear length.
  • Using a stippling brush I blended the foundation into the face; going for a more natural coverage.
  • Apply some concealer underneath the eyes to brighten the skin and create more of a covered base.
  • With the mac set powder apply powder to the skin using a powder puff dabbing the skin.
  • Finish of with some setting spray.


Like matte lips matte skin is extremely fashionable and can be seen in many catwalk and advertising campaigns. The skin is evenly covered and shows no signs of rush or daily stress or makeup wear off which having a slight shine to it can makeup look worn or even sweaty. Dewy skin though is a completely different thing 


Work Val Garland did for Erdem featuring beautiful matte skin that looked striking with the copper tobacco yes and bronzing on cheeks. Featured for London Fashion week.
http://www.harpersbazaar.co.uk/beauty/beauty-shows-trends/news/g35521/london-fashion-week-s-s16-beauty-round-up/?slide=6


The art of dewy skin is something we have covered a lot in lessons and now I feel i've perfected this was the first class of the term that we really looked into the technique and products for both looks but I had previously on my previous makeup term for beauty is boring looked into dewy skin as its definitely a very fashionable look.


  • Prep the skin by removing any past traces of makeup; use cleanser, toner and finish moisturising the face. Make sure there are no contradiction's for the model such as allergies or irritation
  • Using the strobe cream by Mac apply a thin layer onto cheek bones and above brow bone but to add a layer to create a perfect dewy look
  • Mixing the right foundation colours mix a small amount of strobe cream into foundation (I used face and body) 
  • Apply the foundation with a stippling brush which is great for making a flawless smooth base.
  • Depending on coverage more layers of face and body can be added and mixed into skin.
  • Apply Concealer under eye and incase of any redness for a more even base.
  • Don't set with powder instead use a bit of highlight on cheek bones and upper lip to really make the skin stand out 
  • A slightly darker foundation can be added to the concave parts of the face such as the hollows of the cheeks to create more of a sculpted dewy look.


  • More work by Val Garland for London fashion week this time seen on the models for Julien Macdonald the skin here is very dewy and flawless with a dramatic eye that oozes sex and slick back hair that looks wet. On Harpers Bazaar the writer of the article describes the "Imagine a bond girl coming out of the sea and pulling her hair back off of her face" Exactly what I imagined looking at the images for this show, effortless 


    Both images are from Harpers Bazaar.


    Photography

    Lenses

    In this lesson we were looking at different types of lenses that could be explored further for our own shoots for the project. We looked at the lenses 60mm and 100mm; these lenses produce extremely high standard detailing in the photos and are great for close up shoots. The numbers on each lense depend on the focal point and lense type. The 100mm lesson has a more extreme close up compared to the 60mm; meaning it would be excellent for portrait images. This gave me a lot of thoughts to my own work; I will definitely been renting these lenses out for my own shoots especially the advertising campaigns where the product and detailing of the makeup is important. Though expensive the 60mm and 100mm lenses are excellent quality; the difference between more luxury lenses is the fact they are made from mental not plastic like standard lenses.

    After setting up all the equipment correctly we synced the camera to the studio computers and started working with both; I'd never used the computer before in the studio before but found it easy to use and great for close detail images instead of using the preview on the camera, the shots were better to analyse. 


    Sunday, 21 February 2016

    Advanced Plaiting


    Health and Safety

    • Clean washed hands must always be the first thing before touching client
    • Hair is tied back at all times
    • Model should be wearing a apron or protected clothing
    • Must check whether there is any contraindications such as sickness or infection
    Equipment needed
    • Paddle Brush
    • Hair ties

    The 5 strand Plait 
    • Separate the hair into 5 equal sections at the back of the head leaving part of the front of the hair free for the 8 strand plait after completing the 5 strand.
    • start of crossing three strands like in standard plait. Start the plait of on one side of the five sections.
    • cross the section at the side of the head over the strand next to it and under the middle strand; hold the two sections of hair leaving the single strand hanging.
    • work the rest of the hair into the plait; working the two sections from the other side of the head into the strand that was hanging remembering that at every time 3 strands should be on one side of the head being held and 2 in the other hand on the opposite hand. 
    • Continue moving the side of the strand over the strand next to it and underneath again and again to get into routine. 
    • To keep track of movements just think over under over under
    The 8 strand plait 
    • Section one side of the head into three sections
    • starting of with a normal plait cross once and hold the two sections in each hand
    • work the single strand into the original 5 strand plait in between the braid expanding the plait slightly to fit in the new piece of hair. 
    • work the braid down against the original 5 strand plait. 
    The plait can be finished to turn into a 13 strand plait too using same method. 


    Waterfall Braid


    • An extremely pretty braid that I was surprised was easy to achieve. Start of plaiting with three strands at the side of the head.
    • working with your model ask then to hold the piece of hair that will be on its own after plaiting with a standard plait. 
    • Work around the head asking your model to hold the hair away from their face.
    • Can be worked around the head or just pinned to desired end.
    • The hair thats been left out should now be released and fall neatly down the hair.
    Plaiting into the braid.
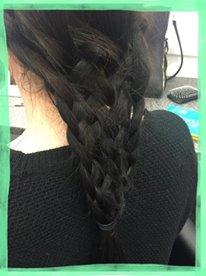
    • With the strands left out of the braid work these now into a ladder plait. 
    • The tighter the hair the tighter the ladder will look.